The most important task before use the plugin is >> first of all install & activate the WooCommerce Plugin from the wordpress.org site and create one sample product and try to buy from front-end. If it is working ok like shopping cart, checkout, payment process and finally order confirmation and all, then after only you should activate the plugin and it will work because without WooCommerce plugin activation, this plugin is not useful.
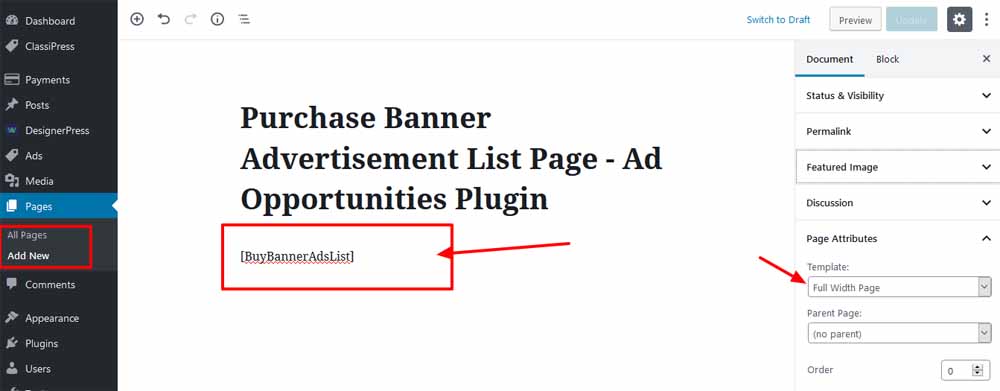
STEP 01: Create Purchase Banner Advertisement List Page
Go to wp-admin >> Pages (left menu) >> Create new page and add the shortcode.
The Shortcode:: [ BuyBannerAdsList ]
Which display list of all ads on click the link you can see buy banner link on ad detail page which make you easy your customer to buy banner paces.
Click to see the page display on our demo
Other Useful Shortcodes
Display Home Page Link via Shortcode
Shortcode :: [ BuyBannerAdsHomePage ]
— Display buy banner space link for home page.
— Click to see the demo link
— It will display home page link with proper settings.
Display all ads Category list Page via Shortcode
Shortcode :: [ BuyBannerAdsCategroyList ]
— Display list of all ads category.
— Click to see the demo link
— On click of the link it will display buy banner button on listing page.
— Easily allow users to buy banners without any manual process.
Display all ads Tags list Page via Shortcode
Shortcode :: [ BuyBannerAdsTagsList ]
— Display list of all ads Tags.
— Click to see the demo link
— On click of the link it will display buy banner button on listing page.
— Easily allow users to buy banners without any manual process.
Display all blog post categories list Page via Shortcode
Shortcode :: [ BuyBannerBlogPostCategroyList ]
— Display list of all blog post category.
— Click to see the demo link
— On click of the link it will display buy banner button on listing page.
— Easily allow users to buy banners without any manual process.
Display all blog post tags list Page via Shortcode
Shortcode :: [ BuyBannerBlogPostTagsList ]
— Display list of all blog post tags.
— Click to see the demo link
— On click of the link it will display buy banner button on listing page.
— Easily allow users to buy banners without any manual process.
STEP 02: Plugin Setting
Install & Active WooCommerce Plugin
First of all activate the WooCommerce Plugin from the wordpress.org site or Click the Link to get more detail about the plugin and all…
Make all WooCommerce settings that need for Installation like page settings, payment gateway settings and other necessary settings…..
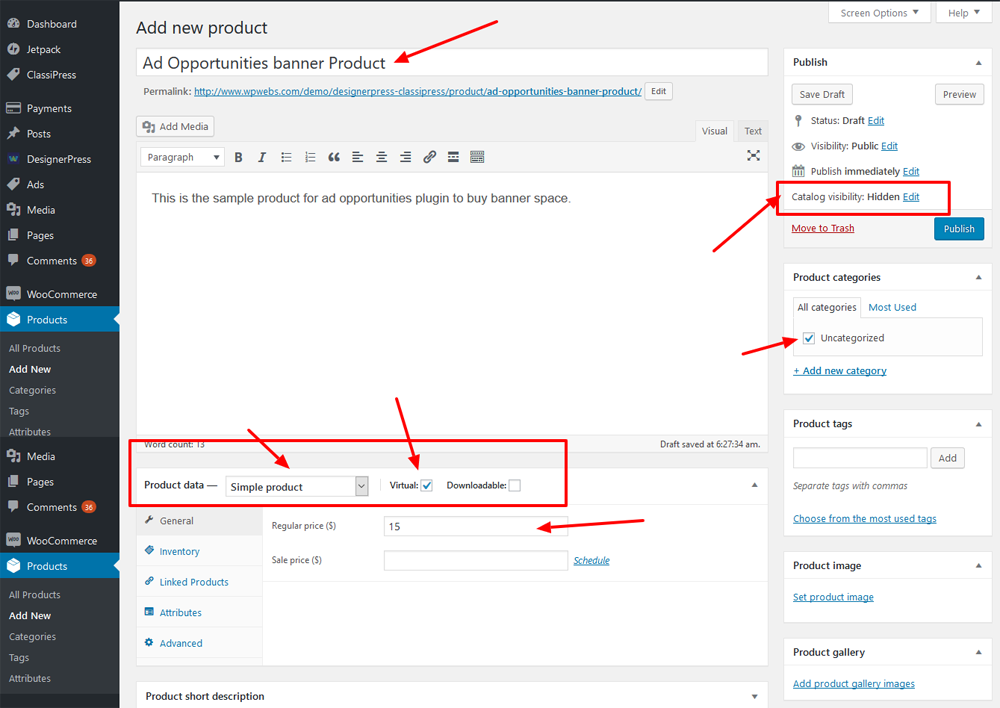
Create Woocommerce Product to buy the banner spaces
Create new Virtual product & set catalog visibility : hidden from Wp-admin >> Products (left menu) Create new product page and set settings and publish it.
Set product title, description if any ,select category, product price and all…..
On Plugin settings page you can see “Advertisement Buy Product” from where you should select your added product and then only user are allow to buy that banner place from front-end site.
Select the create product for banner space ::
From Plugin settings page you can see “Advertisement Buy Product” selection option from where you should select your added product and then only user are allow to buy that banner place from front-end site.

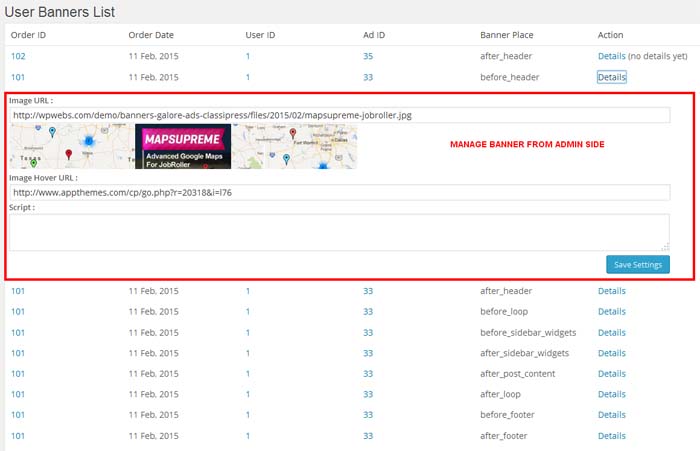
STEP 03: Manage Banners List
STEP 04: Purchase Banner Process
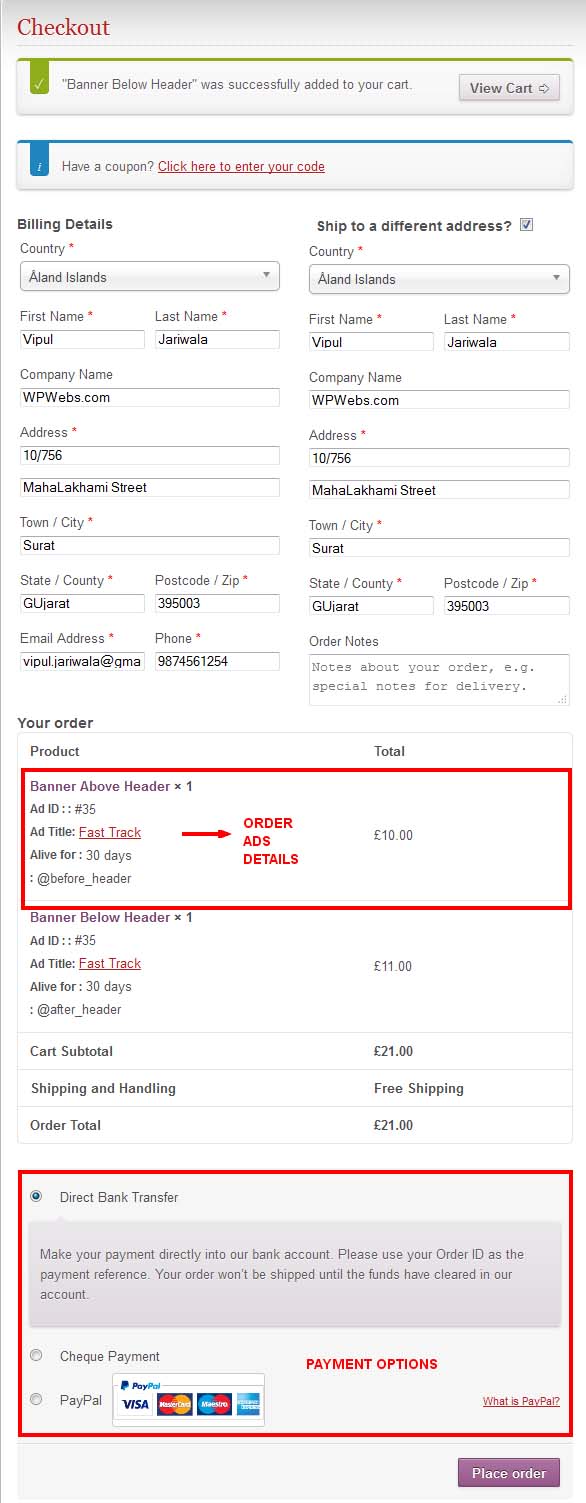
Checkout Page display
— Once the product/ad purchased by any customer it will redirected to checkout page or cart page as per plugin settings .
— As it is wooCommerce plugin as eCommerce platform, you can get more details about complete checkout process from guide of WooCommerce plugin.
— Buyer can manage billing details and shipping details as per settings.
— See order details
— Choose the payment methods as per display.
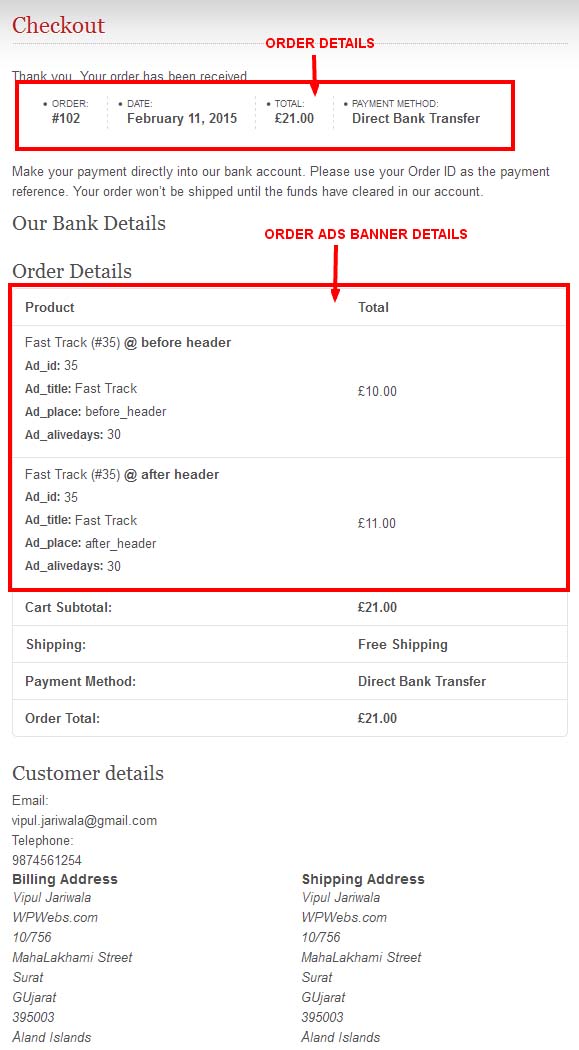
Order Confirmation & Preview
— After checkout you will redirect to payment method as per selection on checkout page.
— If it is offline payment method then buyer can redirected to thank you page OR if online payment, redirected to related payment website….
— Once payment process completed, buyer will be redirected to the thank you page with order details and payment details….
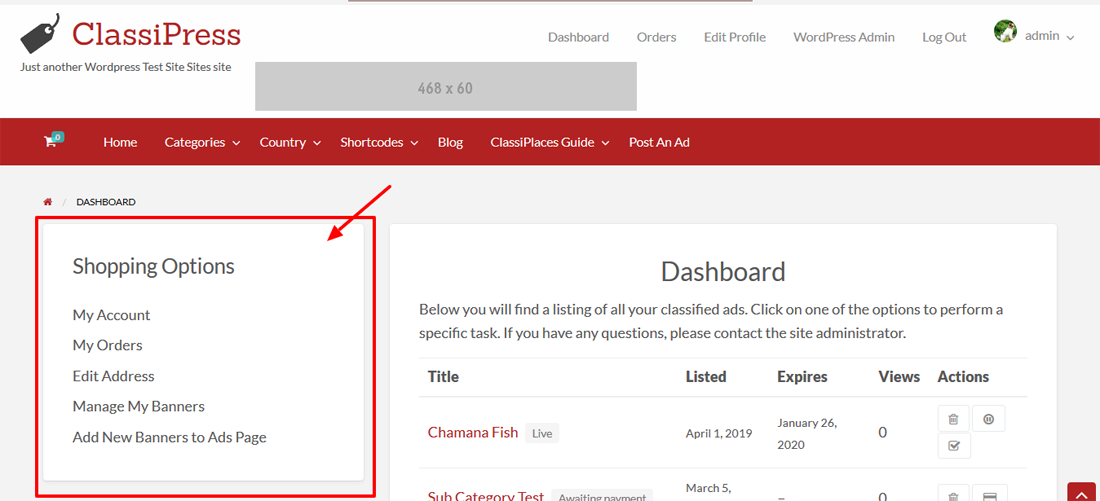
STEP 05: Buyer Dashboard Settings on my Account page – sidebar with links
–It will display shopping related links from where front-end user (buyer) can manage own information.
— My Account will let buyer to manage WooCommerce related account settings.
— My Orders will display list of orders places by buyer.
— Edit Address will allow buyer to manage billing and shipping address
— Manage Banners will allow buyer to add/edit (manage) banners from own.
— Add New Banners to Ads Page allow buyers to choose banners by select the banners palace……added by shortcodes….
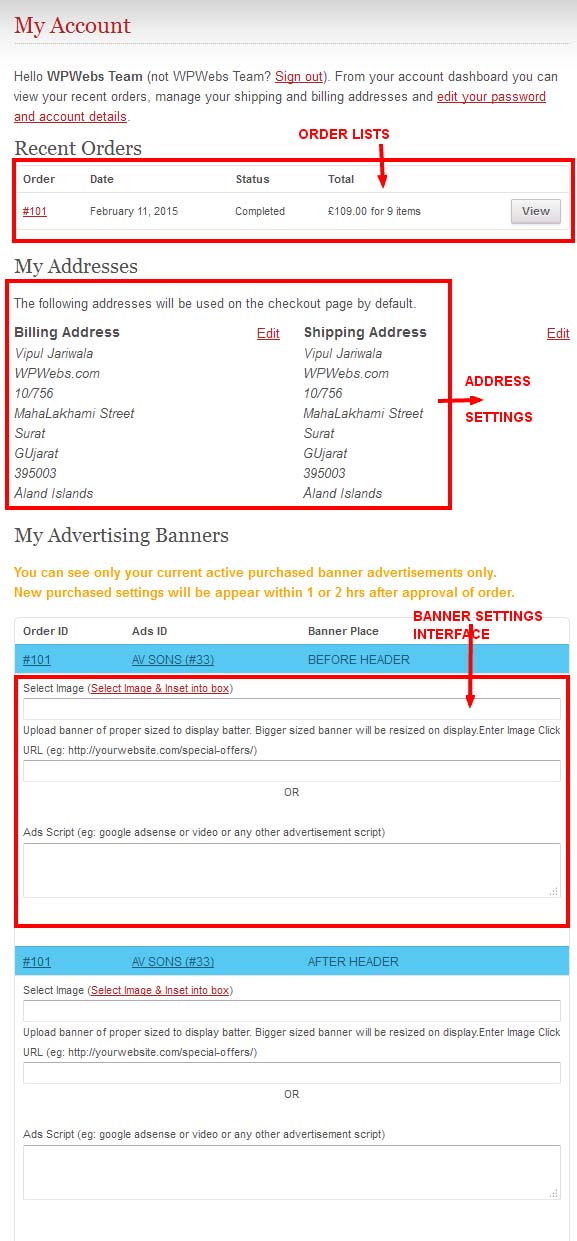
STEP 06: Purchased banner order detail – My Account page
— See list of orders purchased
— Manage address
— Manage purchased advertisement banners as per complete purchased order list.
— From where buyer can add/edit (manage) advertisement banners as per purchased place.
— Once banner added, it will display on the site after some time. There is not any restriction on the advertisement buy admin.
— Admin can check/add/remove/change advertisement content from wp-admin >> banners list — if they fill any problem.
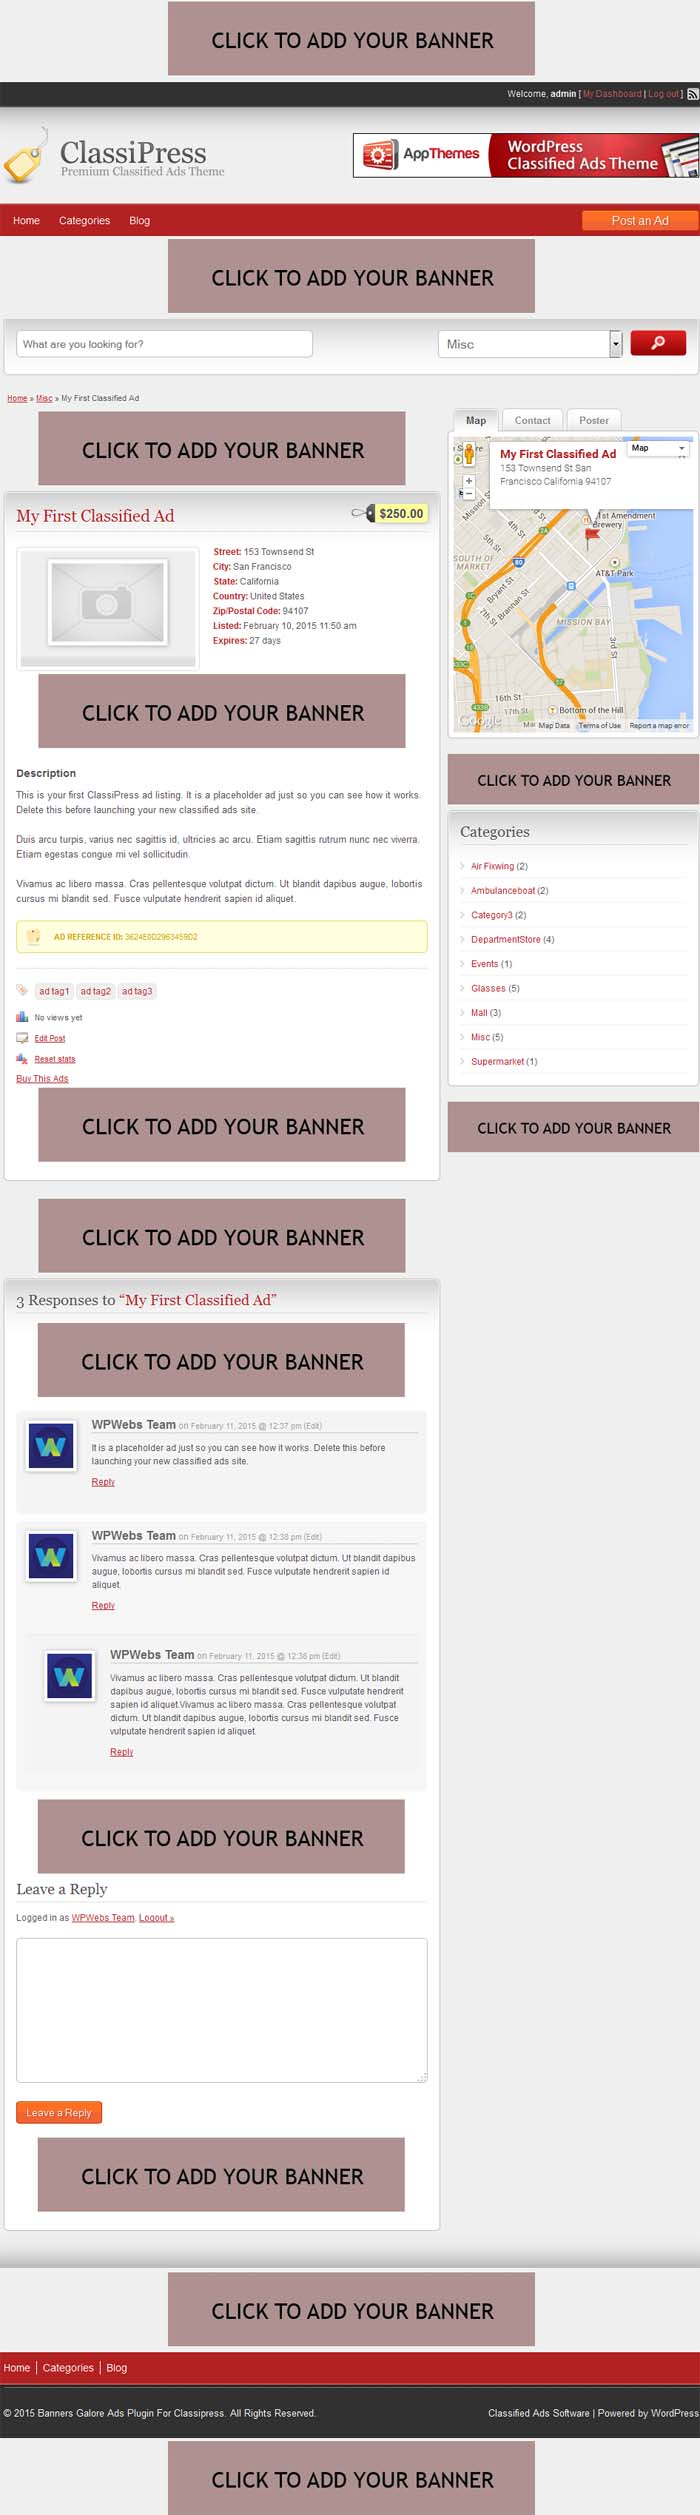
STEP 07: Display banners on Ad detail Page
Banners Sample Ad detail page 01
— Banners will display
Above header,
Below header,
Above ad content start,
Below ad content start,
Above footer,
Below Footer,
Above ad description,
Below ad description ,
Above sidebar,
Below Sidebar,
Above Comments,
Below Comments…

Banners Sample Ad detail page 02